4 most important tips for doing tech presentations

In my job I not only give many technical presentations per year but I also get to watch many technical presentations. At some point, if you do enough presentations requiring live demos you come up with a battle plan to try and thwart technical glitches that can turn an awesome presentation into spoiled milk. Unfortunately not all of us have a dedicated army of technicians like Steve Jobs did, so we have to fend for ourselves.

Here are my top four survival notes to help you stay in the game.

Internet connection. Conference internet is almost universally bad. It shouldn’t surprise you that if you are presenting to a room full of geeks that almost everyone in the room will be consuming cellular and WiFi bandwidth to some extent.

If you present enough times, I can practically guarantee that you will experience intermittent connections or complete failure at some point. This can be very frustrating if your demos require an internet connection.

So, there are several ways to keep plowing ahead when this problem occurs:

  • Take screen shots of any page in your application that requires a round-trip request to a webserver.
  • While you are at home or the office and have a relatively stable internet connection, make a video your demos. You can play this back on your laptop without an internet connection and simply talk through your demo as if it were live.
  • Pre-cache web pages before you go up on stage.
  • Have a portable cellular hot spot with you. So if the conference WiFi goes down, you can switch to the hotspot. Check the hotspot bandwidth ahead of time! In really big conferences even the cell signal can degrade as thousands of people compete for bandwidth.

True story. I was at a conference of approximately 4000 people in San Francisco.  In a workshop I was attending you had to download a very large file in order to properly set up the development environment. Instead of passing around thumb drives, most of the 75 people in the workshop tried to simultaneously download an executable that was approximately 750 MBs. It crashed the internet for the entire conference and most all of the technical presentations in the building came to a screeching halt.

Lesson learned: following these tips means you can keep presenting and be a hero even if the internet totally fails. The bonus is that the facebook/twitter/gamer addicted audience will have to pay attention to you because “they” won’t have any internet access.

Projector resolution. I use a Macbook Pro with a Retina display so I was totally hosed at a recent presentation because the projector forced my laptop into 800×600 presentation mode. Who uses 800×600 projectors anymore?? At a minimum I prepare for 1024×768 and I consider 1024×768 as the absolute bare minimum needed for technical demos. At 800×600 my screen real estate was so small I struggled to alternate between showing a web app in Chrome and demoing something in the developer tools. The Chrome user agent tools window, which is not resizable, took up more than half of the screen.

Lesson learned: when presenting at a new venue or a new room that you’ve never presenting in, always contact the conference coordinator ahead of time to verify the projector resolution .

Font size. It’s hard to see the code in most technical presentations. What looks normal to you on your 2880×1800 Retina Display looks like mitochondria under a microscope to the audience. If the audience can’t see your code you risk turning your great presentation instantly into a mediocre one that much less enjoyable to sit and watch.

And, as much as it drives presenters crazy, you will always have people sit in the farthest reaches of a room…and I mean way at the back. This can be especially true in very large conference rooms. To them your 12-point font settings in IntelliJ, XCode, Eclipse or Visual Studio make your code look like tiny, slightly blurry stars in the Milky Way Galaxy.

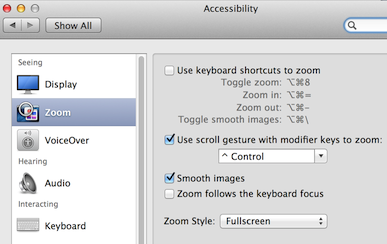
Lesson learned: There’s no such thing as making your font-size too large in a presentation. Seriously, crank up the font-size and then walk to the back of the presentation room and see if you can read it (without the aid of binoculars).  Also make use of your operating systems built-in zoom capabilities. Zoom into the hard-to-see parts of your demo. Another trick is to simply cut-and-paste your code directly into your presentation template and then crank it up to 28 point or greater font size. Wrap your text if it runs off the edge of the slide. Black text color on a white background works the best.

Screen Zoom on Mac

Screen Saver. I’ve seen it happen many times where the presenter is standing in front of the screen talking to the audience and their screen saver kicks in. Then they continue to talk about stuff we can supposedly see  while remaining unaware of what’s going on behind them. It’s even more embarrassing for the presenter if they have baby pandas or their family dogs as a screen saver image.  Or, when trying to log back in they mess up their password a time or two.

Lesson learned: make sure your screen saver is disabled before you present. Thanks to @geeknixta, he told me about an awesome little app on Mac that takes care of this problem with one click…it’s called Caffeine.
RIP Scott Carpenter – legend, hero and original geek (OG)

I was deeply saddened on October 10th when living legend and true hero Scott Carpenter passed away. Scott was an inspiration to me as one of the original Mercury Seven. The fact that he was a Colorado University alumni helped as well.

The Mercury Seven were the best-of-the-best chosen from a pool of 500 applicants. They were the original geeks who paved the way to placing human beings on the moon. Take a moment to consider that they truly made world history and inspired generations of young men and women to become pilots, astronauts and engineers. And, they helped inspire millions of others to dream about traveling to other planets, exploring solar systems and more. They did it for real.

There aren’t too many people these days that can set the standard as high as Scott and his fellow astronauts. There are few accomplishments these days that can galvanize the entire planet as the first attempts to leave earth.

Scott first flew into orbit on May 24, 1962. Can you believe that was 51 years ago?

Sure Scott and his fellow astronauts weren’t perfect and they have had their share of controversy. Some are trying to cast doubt on Scott’s accomplishments. We shouldn’t let perceived or even real mistakes overshadow that he passed some of the toughest training of our times, he took the risks, and he placed his life on the line to try push the technological envelope farther than it had been pushed before.  He lived the dream for the billions of us who will never get to see earth from space.

I can only hope that there are more people in our life time that can stand on the shoulders of the heros from Mercury Seven, the subsequent legendary missions of Gemini, Apollo and Space Shuttle missions and inspire future generations the way I’ve personally been inspired.

Product Review: Seagate Slim Mac portable drive

It’s been a long time since I’ve had the pleasure of being introduced to a consumer device that was 100% brain dead easy to use. This review is on the Seagate Slim Mac 500GB USB 3.0 portable external hard drive and is intended to compliment existing reviews that go into all the technical details. This drive is extremely portable in the sense that it’s just a little bit smaller length-wise than a typical smartphone and about the same thickness.

Full disclosure: I have not received anything from Seagate for this endorsement. Which is too bad actually because I really like the Slim Mac so far.

Testing machine specs. I tested it on Mid 2012 Macbook Pro Retina running OS X 10.8.5 and the factory SSD.

  • 2.6 GHz i7
  • 16 GB 1600 MHz DDR3
  • 512 GB SSD

Type of drive. It’s a hard drive not a solid state drive (SSD). So it has a spinning disk inside and those are inherently slower than SSDs although they are also less expensive for now. Just glancing around I didn’t see any read/write performance specs on the drive. So, maybe my real-world tests below will give some indication of what it’s really capable of as compared to the theoretical performance of USB 3.

Why only 500GB? On a dollar-per-gigabyte scale it is typically more economical to by a 1-terabyte drive. However, I chose a smaller capacity drive for two reasons. First, I wanted something very portable and light. Slim Mac meets that criterion hands down. Second, I plan to only use it for emergencies like when I accidentally loose a file or my main hard drive completely fails so I don’t really need a full terabyte.

First time usage was like a dream. Here’s how easy it was to use this device.

  1. Plugged the device into my Mac.
  2. Instantly I got the Time Machine window.
  3. I selected the Seagate Drive as my target
  4. I selected the option to start backing up.

Elapsed time to complete those four steps was around 15 – 20 seconds.  Yep, you heard that right.

Actual Time Machine Performance. Important note: your mileage may vary (YMMV) in that every machine will back up differently. My initial full backup size was 41 Gigabytes. In an unscientific eyeballing, it took roughly 35 minutes for this to complete. But I figured since it was a real life backup scenario that the numbers would be fairly reflective of what others could expect on a similar machine. As far as I could tell there was no compression on the disk as the physical size of the back on disk was 40.71 GB. This works out to 1.17 Gigabytes per minute. More on this speed below.

Copy-and-Paste Performance. For comparison, I took an application directory that was 3.61 GB and 25,195 files then copied that from my Mac to the Seagate. I ran the test twice and disconnected the USB cable in between tests. This took approximately 47 seconds both times.  That works out to about 0.0768 Gigabytes/sec, or roughly 4.608 Gigabytes per minute, which is nowhere near the USB 3 spec but probably realistic for most real-world copy-paste usage scenarios that you might run into. Without getting too much into the details, read and write speeds vary by the number, physical size and types of files being copied such as images versus executables versus text files.

Packaging.  Cardboard box with an easy to open plastic clamshell inside that held the drive and the USB cable. I simply cut the security seal and had the drive in my hand in about 15 seconds. There was no futzing around to get it out of the clamshell. For some unknown reason, some small portable drives come in what appears to be ballistic plastic that would survive a full-on zombie assault during World War Z. Not this drive, it was well packaged and a breeze to remove.

Casing and smudges. The top of the drive appears to be brushed aluminum and the bottom portion is encased in black plastic. I tried to smudge it up with peanut butter laden fingers which I had from eating my lunch. But the peanut butter wiped right off and the aluminum hid the smudges fairly well. I even tried to scratch it up with my finger nail and wasn’t able to make any permanent marks.

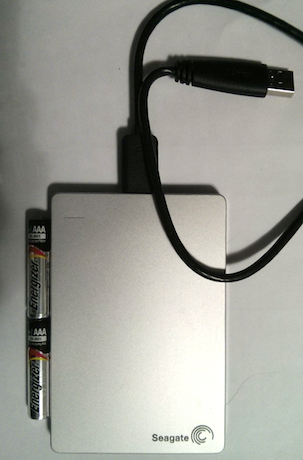
Size and Weight. It fits nicely in the palm of your hand. Dimensions are 0.38 inches thick which is about as tall as a AAA battery. It’s 2.99 inches wide and 4.47 inches long. So, it’s just a little bit longer than 2 AAA batteries stack end-to-end. It weighs a tiny 5.28 ounces, or a little over one quarter can of beer (or soda!). It’s roughly the same width and thickness of my Android Nexus 4, and about 3/4 of an inch shorter. So, if you like packing ultra-light this drive shouldn’t be a problem.

Seagate Slim Mac

Interface. SuperSpeed USB 3.0 spec’d at a “theoretical” 5 Gigabits/sec (not Gigabyte!) and is USB 2.0 compatible at a reduced speed.

  • 5 Gigabits/sec = 0.5821 Gigabytes/sec
  • 34.926 Gigabytes per minute

Okay, now that that’s out of the way you will probably never see these speeds when backing up your data or copying and pasting in real life so don’t get too excited. Real life usage will be much less due to data transmission overhead, USB cable issues, USB hardware, computer bus, hard drive and/or operating system. Different laptops will see different speeds. I also read there have been complaints that USB 3 drives often experience USB 2 speeds. Like I said before: YMMV.

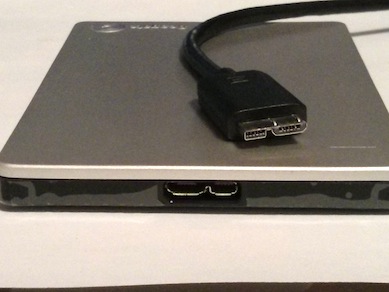
So-so. The drive uses a female USB 3 “Micro-B” connector. The included cable has a USB 2-style connector on one end and a Micro-B connector on the other. So, if your go-bag is filled with old USB micro cables none of those will work on this drive without an adapter. But, I suppose that’s the price to pay to use USB 3. My suggestion is to rubber band the cable around the drive when you are traveling with it.

Furthermore, the adaptor cable that comes with it is short. I measured it at roughly 16.5 inches. If you need a longer cable you’ll have to buy one separately or use a USB 2.0-style extender cable if you already have one.

USB 3 Micro B

References:

Seagate

USB 3.0

Wikipedia USB 3