Best Practices for ActionScript Event Listeners

I see a lot of incorrect instantiation of event listeners, and I’ve also done it wrong quite a few times myself, especially when coding really fast. Doing it right is easy and the following four steps could save you a ton of debugging time later. 

Step 1: First, create the object. In this case I’m creating a Timer object using the ActionScript flash.utils.Timer Class:  

var myTimer:Timer = new Timer(1000);

Step 2: Second, always add your event listeners before executing any of the objects methods. And always, always attach the event listener to an object. Simply calling an addEventListener without attaching it to an object means the listener will receive any events broadcast for that type of event. This can become a nightmare in projects that may have dozens or even hundreds of event listeners running and you have to debug a problem. 

//myTimer is the object to which we will attach the listener.
//timer is the type of listener we want to observe.
//And, timerHandler the function to call when the event occurs.
myTimer.addEventListener(“timer”,timerHandler);

Step 3: Third, now you can call the objects method. I’m going to call the start() method which will kick off the Timer: 

myTimer.start();

Step 4: Lastly, when you are done with an object, always remove the event listener. Leaving event listeners active when they aren’t needed can cause memory leaks. If an object is not removed, it is still registered and it will remain in memory. By removing the event listener, you’ll allow the garbage collector to eventually deallocate it from memory. 

    myTimer.removeEventListener(“timer”,timerHandler);

Why do things in this order? If you add your event listeners after calling a method, such as start(), you can potentially miss an event that occurs right before the event listener is created. By only calling methods after event listeners are created you eliminate the possibility of missing something and banging your head against the wall while trying to debug it under a heavy deadline. 

Here’s a complete Flex 4 sample app that you can play with to try it out: 

<?xml version="1.0" encoding="utf-8"?>
<s:Application xmlns:fx="https://ns.adobe.com/mxml/2009"
    xmlns:s="library://ns.adobe.com/flex/spark"
    xmlns:mx="library://ns.adobe.com/flex/mx">
 <fx:Script>
     <![CDATA[   

       private var myTimer:Timer;

       public function timerHandler(event:TimerEvent):void
       {
          var date:Date = new Date();
          textArea1.text = date.hours.toString()+
             ":"+date.minutes.toString()+
             ":"+date.seconds.toString()+
             ":"+date.milliseconds.toString();
       }   

       protected function start_clickHandler(event:MouseEvent):void
       {
           myTimer = new Timer(1000);
           myTimer.addEventListener("timer", timerHandler);
           myTimer.start();
       }

       protected function stop_clickHandler(event:MouseEvent):void
       {
           myTimer.stop(); 
           myTimer.removeEventListener("timer", timerHandler);
       }
  ]]>
 </fx:Script>

 <s:TextArea id="textArea1" x="15" y="70" width="270" height="20"/>
 <s:Button x="15" y="28" label="Start" click="start_clickHandler(event)"/>
 <s:Button x="103" y="28" label="Stop" click="stop_clickHandler(event)"/>
</s:Application>
Debugging with Flash Builder 4 – Flash Player Debugger Req’d

If you are just starting out with Adobe’s Flash Builder 4, or you installed it on a new machine, you’ll need to install the debug version of Flash Player for everything to work correctly. If you have the regular, non-debug version of the Player installed, the debugger in Flash Builder won’t be able to connect to Flash Player, it will either throw a warning or it will hang and then eventually time-out.

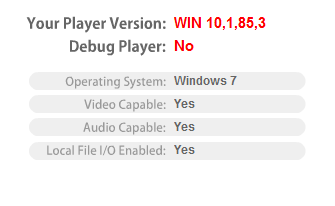
To find out what version of Flash Player you have installed, go here to Adobe’s Flash Player Version Checker. If your results look like this screenshot, you’ll need to upgrade.

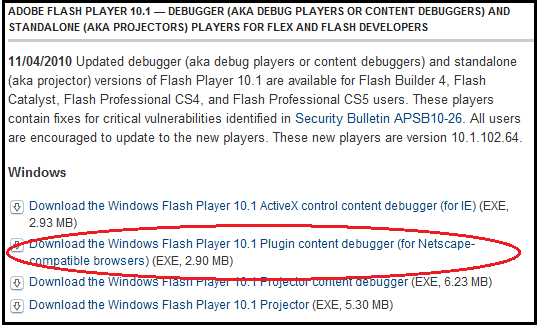
To get the latest version of the Flash Player debugger version go here. Be sure to scroll down the page and look for the section that’s appropriate for your operating system. If you are using Firefox on Windows for example, then choose the Netscape-compatible option: https://www.adobe.com/support/flashplayer/downloads.html

If you are looking to uninstall Flash Player for troubleshooting, then you’ll want to read this Adobe Knowledge Base article.

Flash Builder Burrito makes Android mobile development easy

I had a brief encounter with Adobe’s Flash Builder Burrito during AdobeMAX. But this weekend was my chance to test drive it more fully and build an Android app from scratch. To be fair in this evaluation, I haven’t deployed a production-grade Android app…yet! I’ve really only touched the surface, and I’m sure there’s plenty of gotchas to come. But, first impressions are important and here are a few things I really liked about Flash Builder Burrito.

Likes

Very simple to get started. Check out the list of requirements:

  • Windows or Mac machine
  • FlashBuilder Burrito Preview Version

Take note that having an Android phone isn’t a requirement to get started, more on that in just a moment. If you do have an Android phone, then there are additional requirements:

  • Android with Froyo 2.2, AIR 2.5.x and/or Flash Player 10.1
  • USB driver for your model Android
  • Cable to attach your Android to your development machine
  • Network (for debugging)

At the time I’m writing this your deployment options include Flex, which will run in the Android’s Flash Player 10.1, or AIR 2.5.x, which runs locally on the device.

Makes use of existing Flex/ActionScript skills. I’m still very impressed with being able to use my existing Flex and ActionScript skills to essentially build a prototype mobile app in less than an hour and then deploy it to a phone for testing. When I first saw this at MAX it simply blew me away.

Built-in Emulator, no droid required. A very nice feature that Adobe added to Flash Builder Burrito is you don’t have to have an Android phone to get started building apps. It has a built-in emulator that currently lets you choose from 11 different Android platforms, such as Droid 2 and EVO. You can also easily switch from portrait view to landscape view to simulate turning your phone sideways. That was a simple thing, but a mandatory requirement for testing.

Sure, you’ll need a device to do field testing. For example, I wasn’t able to effectively use my emulator because my app required access to a device’s GPS. Once I deployed my test app to a device, then I was able to test the GPS functionality.

Dislikes

Granted this is a Preview release, there are still a few things I had problems with that would like to see added/changed in the final release.

Needs built-in advanced device debugging. The device debugging interface between Flash Builder Burrito and the Android phone is completely bare bones, absolutely no-frills…nada, zip. If you have any problem connecting to your phone it’s anyone’s guess as to what the actual problem is. You won’t get any useable feedback other than things won’t work. I spent four hours trying to troubleshoot why I couldn’t publish to my Droid 2, the launcher would simply hang.

I followed all the instructions carefully and rechecked them multiple times. I tried almost everything under the sun including multiple versions of the USB driver with reboot after reboot. I even installed the Android SDK and was able to successfully publish to my phone using the adb command-line interface. What finally fixed the problem was I upgraded the phone to AIR 2.5.1 on a whim. And presto, everything worked immediately!

It should be a requirement for Flash Builder to provide feedback about the device and provide hints on what might not be working and suggestions on how to solve the problem. Include something similar to adb devices, which would let me know that Flash Builder even recognizes the Android via USB. I’d also like to see something built-in similar to adb logcat that can provide real-time device feedback for every action that happens on the phone.  

Simplify the Android configurations. In Flash Builder Burrito, you have three specific configuration windows underneath the “Run” option. You have Profile, Run and Debug configurations that all have to be set up properly to make things work. This is really more of an annoyance than a showstopper. But streamlining workflows can save a boatload of time when you’re under the gun to deploy apps to a deadline. I’d like to see these combined into a single window, much like the Project > Properties window.

Improve access to the latest ActionScript mobile documentation. I haven’t yet found Flex/ActionScript 4.5 documentation, and I’m still looking. What I mean is if I type “ActionScript 4.5” into a search engine I expected to find the documentation. I also would like to see all classes and packages that work with AIR 2.5.x mobile in one single location. You can’t even easily find officially labeled Flex 4 documentation on the web, and I did relay this information to Adobe on several occasions. At one point I came across this page listed as documentation. What I did find was typically for ActionScript 3, AIR 2 (old!) and Flash Lite 4. And since that was old documentation, it wasn’t clear what had changed.  I also looked on the Flash Builder Burrito labs site here and the Mobile and Devices Developer Center here which is the first place I would expect a link to be.  

All-in-all it looks like a Adobe did a great job so far. So, that’s it for now since I need to get back to playing with my prototype app. If you have any other likes or dislikes please let me know.