6 reasons why your smartphone battery doesn’t last

I’ve surprised many people when I tell them my Android lasts less than 8 hours under heavy use. And, I’ve lost track of how many times I’ve asked someone how long their smartphone lasts and they really don’t know. The most common response goes something like this “…not sure because I plug it in whenever I get a chance.” Some of my friends even carry separate rechargeable backup battery packs to augment their limited battery life. As soon as their battery gets down to around a quarter tank they plug in the mega backup.
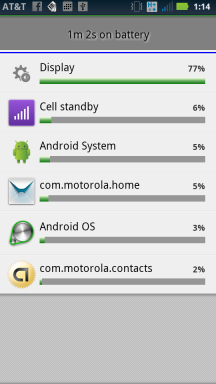
As a developer who builds apps for smartphones, I’ve spent quite a bit of time becoming very familiar with many of the configurable aspects of my various phones all the while using it intensively in build/debug cycles. And, I’ve put some thought into categorizing the different types of battery power usage of which some are less obvious than others. So here goes:

  1. Screen brightness. I turn it all the way down, but this does make reading the screen outside in bright daylight nearly impossible. The fact is the brighter the screen , the more pull on the battery.  On all my phones, the screen is the biggest gas hog.
  2. Number of applications loaded into memory.  Very few of us pay attention to how many applications are loaded/running versus completely shut down.  The more running apps the phone has to manage the more battery is drawn.
  3. Cellular signal strength. If your phone has a weak signal it will boost its own radio to try and compensate.  Cell phone signals are not constant and they ebb and flow all the time. On the down side when signals are weak, the phone will expend additional power to try and keep you connected. Sure, use wireless (wifi) were possible, but when wifi isn’t available you have to rely on good old cellular. It’s commonly understood that 4G draws the most power, 3G draw less and wifi draws the least.
  4. Duty-cycle for using apps. What I mean by this is how much time you use apps during the time period between charges.  If you spend 2 solid hours of app play time between 8 hour charge cycles then that means a duty cycle of 25% (2 divided by 8). The lower the duty cycle the less power is drawn assuming an idling phone with no apps installed is the baseline for minimal power usage.
  5. Number of applications that continuously connect to the internet.  This includes Twitter, facebook, FourSquare, email, etc. Secretly these apps can be very talkative in the background and you might not even know it. Every time they ask the mother ship for an update it draws power to make the request over the internet and then process the results.
  6. Talk-time. Everyone knows that talk time uses battery power, so this is obvious compared to items 1 – 5. On a smartphone you are usually doing other things in addition to talk time. In the days of feature phones, such as the original Motorola Razr, the only thing you could do with those was talk, talk, talk and intermix that with some limited texting. At least for me, over the period of 8 hours I’ve spent much more time (or duty cycle) using apps, such as email, as compared to making phone calls.

Hopefully this takes some of the mystery away from short battery life. We all wish batteries could last days, but we unconsciously create situations within our phones that draws down the battery much faster than expected. And, their are situations beyond our control. such as low cell signal strength, that draw extra power.

3 Steps for Determining if Your Website is Mobile Ready

Here are three step for helping determine the mobile ready strengths and weaknesses of your existing website. I’ve had a number of conversations from website teams recently asking the question: “Can we reuse our existing site for mobile users?” I was surprised to learn that the individuals asking me the question had, in fact, never visited their own site on a mobile device.

Note, this blog describes steps that need to be address before you decide whether to build for the web or native applications.

Step One – Create a small focus group of company outsiders, friends as well as employees.

  • Gather as many different types of mobile devices as possible including: iPad, iPhone, Android tablet, and several varieties of Android phones. Try to use a combination of older and newer devices. Don’t fool yourself by simply using all of the latest great versions, especially if your web visitors are the general public.
  • Get a mobile projector, such an Elmo or IPEVO.
  • Write down the common use cases, and the workflows associated with them. An example use case might be logging in to your site. And, a workflow would describe the steps a user takes to complete the login process  from beginning to the end.
  • Visit your website and run through the common use cases.
  • Turn off wireless, if possible, and let everyone experience typical internet speeds to simulate, for example, standing in line at the grocery store.
  • Trade off using different devices.
  • Hire a user interface (UX) designer if you don’t already have one. Bring them on board at the beginning, or as early as possible, in this evaluation process.

Step Two – Create a grading system to help assess the experience everyone had with each device.

  • Were you able to accomplish your task as easily and quickly as if you were at your desk with a full-size laptop or computer?
  • Did you have to do a lot of extra panning and zooming in and out to navigate through the use cases and workflows?
  • Was there any functionality that simply didn’t work, didn’t work correctly, or didn’t work as expected on the mobile device?
  • Were there any aspects of the site that looked different or wrong? For example, was all the text the right size? Was everything in the right place?
  • Were you satisfied with the amount of time it took for pages and images to load?
  • Were you able to comfortably use the site when rotating the phone between landscape and portrait views?
  • Were you okay with how quickly you were able to switch between different pages on the website?
  • Were you able to access secure resources without any problems?
  • And, perhaps most importantly, were there any obvious improvements you would like to see made to make mobile surfing experience better?

Step 3. Apply some commonly known mobile-specific conditions to your findings and see if helps to provide context to everyone’s experience.

  • One-handed plus gestures. It’s a fact that navigating a mobile web is significantly different from a desktop browser. There’s no mouse! Mobile browsing is usually done with one hand, while the other hand is used to hold the device. The screen is driven by what are called gestures. Examples of gestures are when you swipe your thumb upward on a page to scroll it downward, or when you use two fingers, usually the index finger and thumb, to pinch zoom the screen in or out.
  • Smaller Screens. And, of course the screens are much smaller than what you would find on a desktop or laptop. Different devices have different resolutions. And, navigating a full website can seem more cumbersome as you use gestures to navigate around, in comparison to the desktop experience of seeing the entire page, and using your a precision mouse to whip through the different links on a page.
  • Download Speeds. Download speeds on mobile devices vary considerably compared to your work machine hooked up to a reliable local area network (LAN). A site that seems zippy on your work machine, may load much differently on a typical smartphone. Also, for some older phones they may have much less processor power and that may lead to the perception of slower download speeds as the CPU chugs through displaying the page.

How do I interpret the results?

When you are done compile, discuss and analyze the findings with your internal teams and stakeholders.

Good. If most testers successfully navigated the majority of use cases and workflows then you are in good shape, and you may simply need to do some additional tweaking to your site.

Not so good. However, if most testers had unsatisfactory experiences then you’ll need to spend more time looking more closely as what worked and what didn’t work. You may find workflows that are great on a desktop machine that are clumsy and awkward on a mobile device.

Don’t be surprised. Portions of your site may have to be redesigned. You may not be able to include everything that’s in your full site into your mobile site. You may have to spend a lot of time optimizing the site to speed up page load times. Pay special attention to functionality that didn’t work on mobile. Mobile web browsers have well known limitations compared to full browsers. Looking at what didn’t work may help you decide if you need access to native device capabilities.

You’ve just taken a huge first step towards helping your team set the stage for stepping into the mobile world.

Troubleshooting multi-threading problems related to Android’s onResume()

This post is a continuation of a previous post I wrote about best practices for using onResume(). I found a particularly testy bug that caused me 2 hours of pain time to track down. The tricky part was it would only show up when there was no debugger attached. Right away this told me it was a threading problem. I suspected that the debugger slowed things down just enough that all the threads could complete in the expected order, but not the actual order that occurred when running the device in stand-alone mode.

The test case. This is actually a very common workflow, and perhaps so common that we just don’t think about it much:

  • Cold start the application without a debugger attached. By cold start I mean that the app was in a completely stopped, non-cached state.
  • Minimize the app like you are going to do some other task.
  • Open the app again to ensure that onResume() gets called.

Now, fortunately I already had good error handling built-in. I kept seeing in logcat and a toast message that a java.lang.NullPointerException was occuring. What happened next was troubleshooting a multi-threaded app without the benefit of a debugger. Not fun. I knew I had to do it because of the visibility of the use case. I couldn’t let this one go.

How to narrow down the problem. The pattern I used to hunt down the bug was to wrap each line of code or code block with Log messages like this.

Log.d("Test","Test1");
setLocationListener(true, true);
Log.d("Test","Test2");

Then I used the following methodology starting inside the method were the NullPointerException was occurring. I did this step-by-step, app rebuild by app rebuild, through the next 250 lines of related code:

  1. Click debug in Eclipse to build the new version of the app that included any new logging code as shown above, and load it on the device.
  2. Wait until the application was running, then shutdown the debug session through Eclipse.
  3. Restart the app on device. Note: debugger was shutdown so it wouldn’t re-attach.
  4. Watch the messages in Logcat.
  5. If I saw one message , such as Test1, followed by the NullPointerException with no test message after it, then I knew it was the offending code block, method or property. If it was a method, then I followed the same pattern through the individual lines of code inside that method. This looked very much like you would do with step-thru debugging, except this was done manually. Ugh.

What caused the problem? As time went on, and I was surprised that I had to keep going and going deeper in the code, I became very curious.  It turned out to be a multi-threading bug in a third party library that wasn’t fully initialized even though it had a method to check if initialization was complete. The boolean state property was plainly wrong. This one portion of the library wasn’t taken into account when declaring initialization was complete. And I was trying to access a property that wasn’t initialized. Oops…now that’s a bug.

The workaround? To work around the problem  I simply wrapped the offending property in a try/catch block. Then using the pattern I described in the previous blog post I was able to keep running verification checks until this property was either correctly initialized, or fail after a certain number of attempts. This isn’t 100% ideal, yet it let me keep going forward with the project until the vendor fixes the bug.

Lessons Learned. I’ve done kernel level debugging on Windows applications, but I really didn’t feel like learning how to do it with one or multiple Android devices. I was determined to try and narrow down the bug using the rather primitive tools at hand. The good news is it only took two hours. For me, it reaffirmed my own practice of implementing good error handling because I knew immediately where to start looking. I had multiple libraries and several thousand lines of code to work with. And, as I’ve seen before there are some bugs in Android that simply fail with little meaningful information. By doubling down and taking it step-by-step I was able to mitigate a very visible bug.