Accessing HTML5 Geolocation via ActionScript

Read on to learn how to access the HTML5 Geolocation API using ActionScript in a web app. Using the patterns below you can get access to a visitor’s approximate location in applications that run in a desktop or laptop browser. Mobile ActionScript/Flex/AIR apps have convenient, built-in access to location via the flash.sensors.Geolocation Class. However, with a web app you have to cobble together your own code using ExternalInterface.

The key to all this is using ExternalInterface’s addCallback().  This method lets you access ActionScript from JavaScript code in the wrapper HTML file, which if you didn’t know is the .html file that is used to launch Flash Player.

There are two steps to take that make it work:

Step 1. In addCallback() set the first parameter to the name of the function you will invoke in JavaScript to send data to your ActionScript method. Set the second parameter to the name of the actual ActionScript method. ActionScript will then recognize when the method specified in the second parameter is called. Essentially this sets up a listener in ActionScript.

Step 2. Set the call() method so that it invokes a public JavaScript function. When it’s done running, then you fire off the JavaScript function specified in the first parameter of addCallback().

If that doesn’t make any sense, check out the code below to see how it all fits together. Note, you can either hard code your JavaScript in the wrapper HTML file, or you can do what I do below and inject it into the DOM at runtime using the document.insertScript pattern so you know it’s always there.

public function findLocation():void
{
	if (!Geolocation.isSupported)
	{
		const  VERIFY_GEOLOCATION:String =
			"document.insertScript = function(){" +
				"verify_geolocation = function(){"+
					"var geoEnabled = false;" +
					"if(navigator && navigator.geolocation)" +
					"{" +
					"    return geoEnabled = true;" +
					"}" +
					"else{" +
					"    return geoEnabled = false;" +
					"}"+
				"}"+
			"}";

		const  GET_GEOLOCATION:String =
			"document.insertScript = function(){" +
				"get_geolocation = function(){"+
					"var mySWF = document.getElementById('YourApplicationName');"+
					"navigator.geolocation.getCurrentPosition(function(position){"+
					"     mySWF.sendGeolocationToActionScript(position);"+
					"});"+
				"}"+
			"}";

		if(ExternalInterface.available)
		{
			//load the script into DOM
			ExternalInterface.call(VERIFY_GEOLOCATION);

			//call the JS function
			var geoEnabled:Boolean = ExternalInterface.call("verify_geolocation");

			if(geoEnabled == true){
				//Load the script into DOM
				ExternalInterface.call(GET_GEOLOCATION);

				//Step 1: set the ActionScript callback
				ExternalInterface.addCallback("sendGeolocationToActionScript",geolocationResultHandler);

				//Step 2: call the JS Function
				ExternalInterface.call("get_geolocation");
			}
		}
	}
}

//Access this Handler from JavaScript
public function geolocationResultHandler(obj:Object):void
{
	//Access the HTML5 Geolocation object properties just like you would in JavaScript
	Alert.show("Latitude: " + obj.coords.latitude + ", "Longitude: " + obj.coords.longitude );
}

Test Notes:

I compiled this code using FlashBuilder 4.6 using Apache Flex 4.6. The functionality was tested on Internet Explorer 9, Chrome 21 and Firefox 14.

References:

Adobe ActionScript Reference – ExternalInterface
Adobe Help – Accessing Flex from JavaScript
How to upgrade your AIR SDK in FlashBuilder 4.6

This post walks through the steps for upgrading your AIR SDK.  There are just a few tricks and I spell them out here since this isn’t a one-click, plug-in-play operation. As of this writing, AIR 3.3 is the latest version, whereas FlashBuilder 4.6 came with v3.1 installed.

Why upgrade? In my case I had two reasons. First, I’d heard from a co-worker that AIR v3.3 compiled significantly faster. And, second I ran into a few flaky bugs and I wanted to test my builds using the latest SDK version.

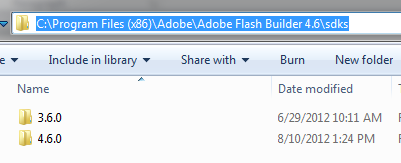
1. Make a copy of the Flex SDK directory and place it in the same default sdk directory. On windows this is C:\Program Files (x86)\Adobe\Adobe Flash Builder 4.6\sdks. Rename the new directory you just created to something like “4.6A3.3”.

2. Download latest AIR SDK (zip) file from Adobe. Yep, even though Adobe open sourced Flex, they still produce AIR and the FlashPlayer runtime: https://www.adobe.com/devnet/air/air-sdk-download.html.

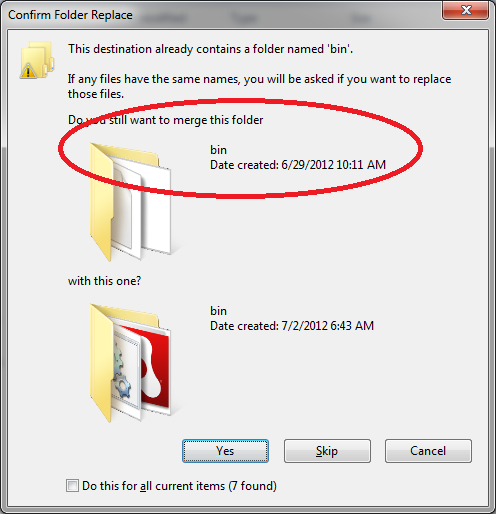
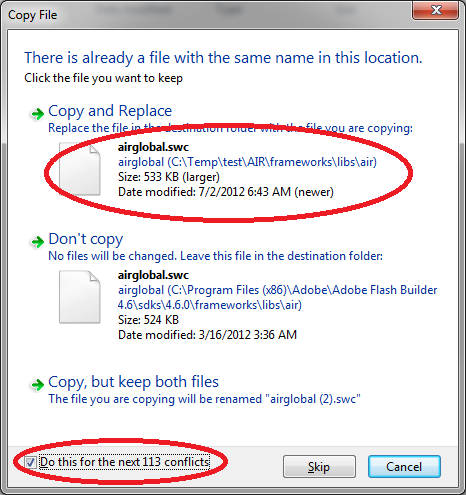
3. Merge the contents from the AIR SDK zip file into the new copy of the Flex SDK directory. There will be some files that you have to overwrite in order to get the latest version.

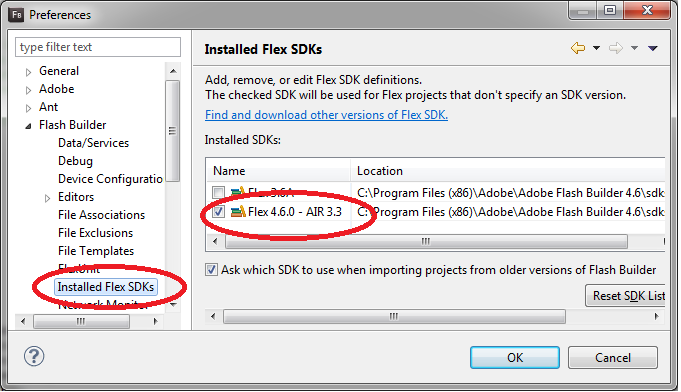
4. Instruct FlashBuilder to use the new SDK by going to Window > Preferences > Flash Builder > Installed Flex SDKs, and then click “Add”. If you want to keep track of the different AIR versions related to Flex then make up a new naming convention for the SDK such as “Flex 4.6 – AIR 3.3”.

5. For existing projects which are using the older versions of AIR, such as Flex mobile projects, you’ll need to manually update the app.xml file to use the correct SDK version number in the namespace (xmlns). This file can be found in your FlashBuilder Project using the Package Explorer. If you don’t make this change you’ll get a compiler error. Your app.xml namespace should look like this. Note that when you create a new mobile project it should automatically be created with the correct xmlns settings.

<?xml version="1.0" encoding="utf-8" standalone="no"?>
<application xmlns="https://ns.adobe.com/air/application/3.3">

<!-- Adobe AIR Application Descriptor File Template.

	Specifies parameters for identifying, installing, and launching AIR applications.

	xmlns - The Adobe AIR namespace: https://ns.adobe.com/air/application/3.3
			The last segment of the namespace specifies the version
			of the AIR runtime required for this application to run.

	minimumPatchLevel - The minimum patch level of the AIR runtime required to run
			the application. Optional.
-->

Here’s an example of the error you’ll get if you don’t do this. You’ll see something like “Namespace 3.1 in the application descriptor file should be equal or higher than the minimum version 3.3 required by the Flex SDK.”

References:

Adobe Doc – Overlay the AIR SDK with the Flex SDK

Using ActionScript Tokenized Asynchronous HTTP Requests

My recent Antarctica Flex/ActionScript app had a requirement for tokenized asynchronous requests. That way I could use a centralized HTTP controller through which every outbound request was submitted. By attaching a “token” to each request, I could properly manage the response payload for the dozen’ish different processes that were going on. In other words, you attach a unique identifier to the outbound request. When the server sends back its response to the client application, this unique identifier is passed along in the payload. Quite cool, right?!

I’ve used this technique in heavy-duty, server-side applications before but only a few times in a web client. In practice it works brilliantly and it allowed me to easily organize the HTTP responses from many different types of requests and keep them all straight. At the heart of controller was this pseudo-code. If you haven’t done this before, there are just a few tricks to make it work right. I’ve included all the code to make your life easier. The token variable is a String that you create and then pass to the AsynchResponder.

                               
_http = new HTTPService();
_http.concurrency = "multiple";
_http.requestTimeout = 20;
_http.method = "POST";

var asyncToken:AsyncToken = _http.send( paramsObject );  
                                     
//you pass the token variable in as a String
var token:String = "someValue";
var responder:AsyncResponder = new AsyncResponder(resultHandler,faultHandler,token);
asyncToken.addResponder(responder);

Elsewhere in the app, the other classes that used the controller received the response payload via the event bus and then filtered the response by the tokens using a switch/case statement. AppEvent is my custom event bus that would broadcast the payload to the entire application via an Event. This allowed me to fully decouple the http controller from being directly wired into my other classes. It made the app very flexible in that action would only be taken when the response came back. If you want a few more details about this architecture, then check out my blog post on it. Here’s the HTTP response handler pseudo-code that is inside the controller.

Just a note, the HTTPData Class is a custom object I wrote to manage the response data. You could manage the data anyway you like. This is just one example of how to do it.

private function resultHandler(result:Object, token:Object = null):void
{	
	var httpData:HTTPData = new HTTPData();
	httpData.result = result.result;
	httpData.token = token; 
	AppEvent.dispatch(AppEvent.HTTP_RESULT,httpData);
}

And, here’s the response handler that’s inside one of the applications pages (views) that recieve the payload via my event bus:

AppEvent.addListener(AppEvent.HTTP_RESULT,httpResultHandler);

/**
 * Handles setting up many of the user variables based on tokenized,
 * asynchronous HTTP requests.
 * @param event AppEvent from HTTP request.
 */
private function httpResultHandler(event:AppEvent):void
{
    var json:String = event.data.result as String;	
    
    //route the tokens through a switch/case statement
    switch(event.data.token)
    {
         case "getallgpspoints":
              parseGPSPoints2(json);
              break;
    }
}

You can download the entire controller example here. If you use it for your own work, you’ll have to comment out anything you don’t need like some of the import statements and the custom events. Have fun!